I currently use Lightroom 4 for photo editing. It is my favorite editing program that I have ever used. I feel like it is easy, fast, and gives great results. That said, I have previously used other editing software. You don't have to go out and buy Lightroom to make your photos good.
The first, and most important, photo editing tip that anyone can ever give you is to take good photos to start with. No editing software in the world is able to fix a photo that is out of focus or taken from the wrong angle. In my opinion, at least, post processing should simply be used to enhance an already good photograph into a great one. Keep in mind, though, that everyone has their own style- what I like may not be what you like, and vice versa. And that is okay!
Here is a really simple example.
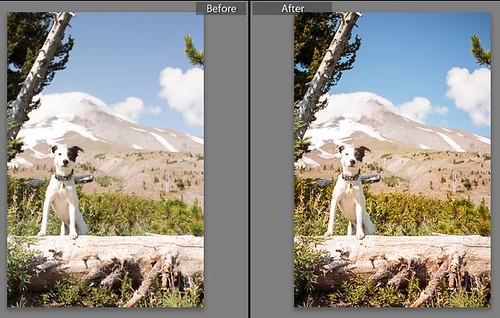 |
The Before photo was a good photo. It is exposed properly, has decent framing, correct focus, and the dog is looking adorable. The After photo is very similar but, in my opinion at least, it is also much better. The colors are more vibrant and the dog's eyes are sharper and more expressive. But none of that would matter if the dog was out of focus!
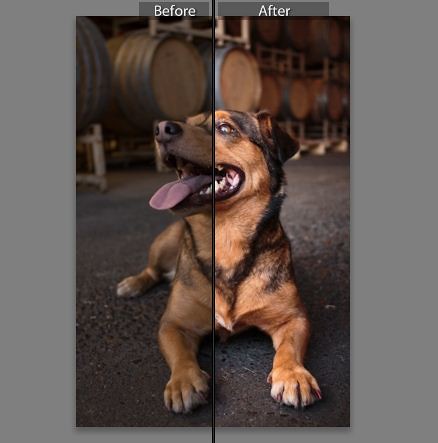
Here is a bit more obvious of an example.
The Before photo is good. The dog is in focus, there is a definite feeling of motion. But, the After photo is more vibrant, sharper, the dog pops and is more obvious. The dust cloud behind the dog looks more like a dust cloud from motion and less like an out of focus haze. I know I strongly prefer the After photo.
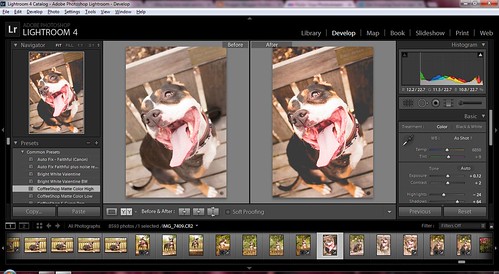
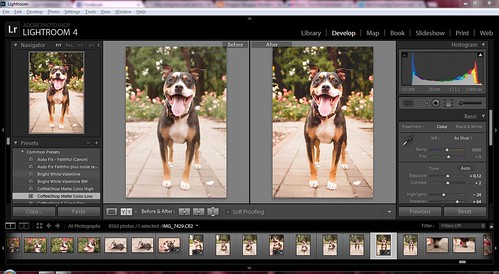
Okay. So, lets get down to it. How, exactly, do I go from the Before photo to the After one? I am going to assume that you have Lightroom and know how to import photos. My personal preference is to use Presets. Presets are basically a way of saving all of the changes made to a photo so that you can apply them to a different photo all in one click. You can see in the below screenshot that there is a list of Presets on the far left hand side under the preview picture.
I almost always edit photos in the Develop mode, though I will sometimes apply a preset to an entire collection of photos from the Library dashboard as well. The above screenshot is in the Develop mode. Along the bottom of the screen are the photos you can select to work with. Click on a photo to work with it. If you then hover your mouse over different presets, the preview picture in the top left corner will show you a preview of what that preset will look like once applied to the photo. Click on the preset to apply it to the photo. (Ctrl+z is Undo if you make a mistake and want to go back.)
Here is a bit more obvious of an example.
 |
The Before photo is good. The dog is in focus, there is a definite feeling of motion. But, the After photo is more vibrant, sharper, the dog pops and is more obvious. The dust cloud behind the dog looks more like a dust cloud from motion and less like an out of focus haze. I know I strongly prefer the After photo.
Okay. So, lets get down to it. How, exactly, do I go from the Before photo to the After one? I am going to assume that you have Lightroom and know how to import photos. My personal preference is to use Presets. Presets are basically a way of saving all of the changes made to a photo so that you can apply them to a different photo all in one click. You can see in the below screenshot that there is a list of Presets on the far left hand side under the preview picture.
 |
| A view of my screen in Lightroom |
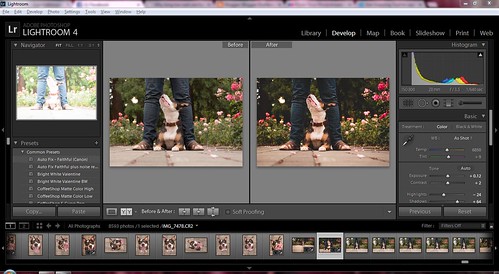 |
In the above screenshot, you can see in the preview picture that the preset would seriously over expose and wash out the photo.
Important to note is that most presets can not be layered on top of each other. For the most part, applying a preset will override any previous editing you have done to the photo. Apply your preset first, then go in and tweak the settings if needed. A few presets edit just a single thing in a photo, such as color curves or sharpening, and can be used with other presets.
You can apply a preset to an image and call it done, and it is literally a one-click edit. You can get some pretty decent results from doing this. I think it is a great method for pictures that you plan to share (on your blog, on Facebook, etc), but that don't ultimately mean a whole lot to you. One click makes them good enough to share and saves you a ton of time. I especially use one click edits when I take hundreds of pictures at an event (like a lure coursing weekend), since most of the photos will only be looked at once or twice and then forgotten. I can always go back in and do more edits to a photo later if the need arises.
 |
| One-click edit using the preset Faithful |
Of course, how the final photo looks after applying the preset depends a lot on what the original photo looks like! So, results may vary depending on the out of camera photos you are working with.
Because I love all of you guys, I decided to put together a small collection of my favorite, most often used presets to share with you. You can access and download them here on Google Docs. I included my six current favorite presets. Feel free to download them, try them out, tweak them your way, resave them as something else, etc. They are yours to use. To install, click on the link. click the preset you want, then click download. Note where the file is being downloaded to. Then open Lightroom, go into Develop, and right click on one of your folders of Presets. Select Import, then select the file you just downloaded. It should be good to go!
A little bit about each of the presets, to help you get started with them.
Faithful is a very basic preset. I used to use it all the time, and still use it in certain circumstances. I often end up going back in to edit the exposure after applying it, or do other tweaking, but it can do a lot for getting a picture close to where you want it to go.
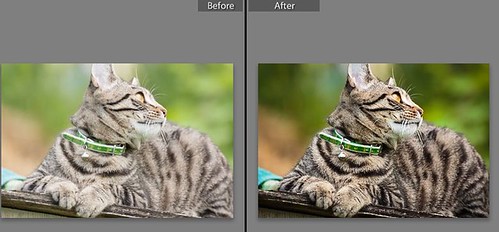
Eye Pop is probably my most used preset. I find that it works great on a variety of photos to give an extra boost of color, a bit of extra umph, and that it especially does wonders for a dog's eyes. It can do some funky things to human skin sometimes though.
Curves Pop and Curves Pop Matte are two of those rare presets that can be used on top of other presets. They only change the tone curve. Curves Pop makes your colors and blacks more vibrant, while Curves Pop Matte does the same thing, but also applies a mild matte effect as well.
 |
| Before/After with Eye Pop and Curves Pop Matte |
Smooth As Silk is a very basic smoothing preset. It can be applied on top of other presets. I normally use it to smooth out grain from high ISO, but you can also use it to create a softer look on photos without much grain to start with.
When you are done editing your photos, whether you spent two seconds selecting and applying a preset and left it at that, or spent an hour tweaking all the little things that could possibly be tweaked, head back over to the library. Select the photos you worked on and click export. Fill out the export dialog to name the files, put them in the proper folder, resize them, or apply a watermark. Then export and share!
 |
| Edited with Faithful, then adjusted the exposure and temperature |
I hope you enjoyed reading a bit about how I edit photos. Please let me know if I didn't explain something clearly enough, or if you have any questions, please ask!
You can also find additional Lightroom Presets in many places on the internet. This website has a good collection of presets. I tend to lean toward clean edits that just enhance the photo to look more like what you see in real life, but many people make presets to create many different looks. It all depends on what you like in your own photos.
You can also find additional Lightroom Presets in many places on the internet. This website has a good collection of presets. I tend to lean toward clean edits that just enhance the photo to look more like what you see in real life, but many people make presets to create many different looks. It all depends on what you like in your own photos.
LOVE THIS! I edit all of our photos in Lightroom as well. For the price, I think it has awesome features and does just what I need it to do.
ReplyDeleteAlways enjoy new presets - thanks! ;-)
ReplyDeleteThe change to the cat, and that last shot of Pallo are pretty impressive. I'd love to know the actual changes made by that preset.
ReplyDeleteI edit with ACDSee, and while it has presets, I haven't been using them. I'll have to look online and see if there are some good ones I can download. Normally I end up finding a representative sample of an album in terms of lighting and color, manually tweak that until I like it, then apply those settings to the rest of the album. Then I manually crop, resize the result, sharpen, and lastly do noise removal.
I love your photography! I've been using lightroom for the past year but there's always the fear I've popped the colors or contrast too far, into unnatural territory. Thanks for sharing your presets.
ReplyDeleteThank you for the post! Very informative :-)
ReplyDeleteI don't have Lightroom but it was still interesting! Thanks!
ReplyDeleteI'm going to checkout Lightroom.
ReplyDeleteI'm going to checkout Lightroom.
ReplyDeleteI want to do more edits on my photos. I currently have Photosohp Elements but have considered upgrading to Lightroom. I have heard amazing things about it....but I don't even know how to use Elements so I am not sure I should. I am also confused about the Adobe monthly "rental" now of Photoshop - is it the same for Lightroom? If not, I might be able to get a discount on the software from school.
ReplyDeleteHow do you get the photos of what you've done in LR into your post, take a screen shot? I haven't tried to do that, never had the need I guess :) I use Lightroom 4 as well. I recently bought a pair of glasses from the $2 shop to use when working on photos and I'm too scared to look at my blog posts as I've probably oversharpened all my photos!! It's amazing what I can see now!
ReplyDeleteI grabbed your presets, thanks. Lately I've been learning about brushes in LR and they're quite fun. So much to learn and so little time. It's an awesome programme.
I meant to ask .. is there a secret to getting the alt text to show up when you mouse over your photos? Since I've been using Lightroom my alt text won't show up on my blog photos. I fiddled with all sorts of setting in LR but haven't worked it out yet.
ReplyDeleteNice dogs and photo editing as well
ReplyDelete