Showing posts with label Flyball Training series. Show all posts

Friday, October 4, 2013

Releasing Your Flyball Dog

This past weekend's flyball tournament was a lot of fun. I was boxloading for one of my club's teams and running Koira on the other one. I also was trying to get some pictures during the tournament as well. Something that has fascinated me for a while is all of the different methods of releasing a dog when playing flyball.

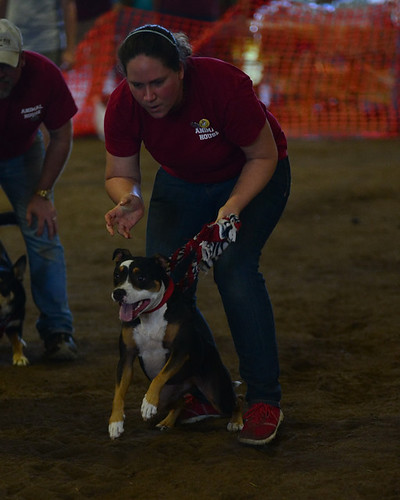
In the past, I have used many different starting positions with my dogs. Most recently before this weekend, I simply put the dog between my legs, bent over to hold onto their collar, then let go when the time was right.
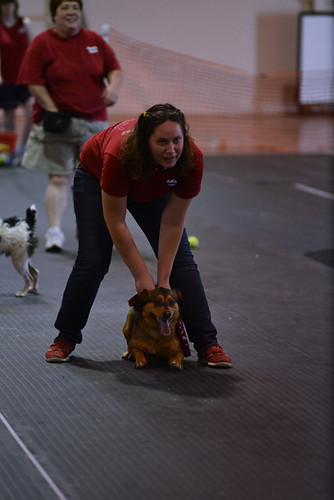
DSC_6160-2635325390-W
Releasing Pallo for a pass

DSC_1098-2771530939-W
Releasing Koira in start

While this method actually works really well with Pallo, it kind of fails with Koira. Koira gets very excited and barks up into my face, while Pallo hunches down and stares down the lane. The looking up ends up making Koira really unreliable when starting with this method, which I learned after the X-Fidos tournament.

This past weekend, I tried out a new method.
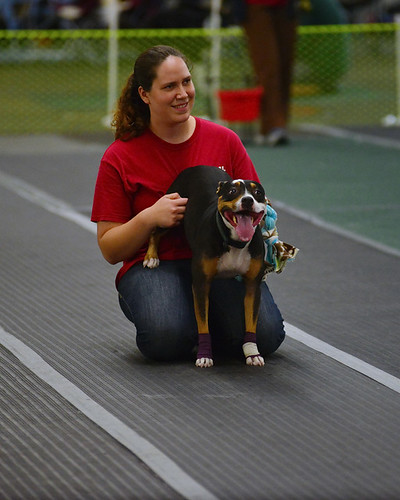
48855364-DSC_2398
Releasing Koira in start from my lap

Instead of standing over Koira, I am kneeling and pulling her back legs up onto my thighs. This gives her a solid launch platform and seems to focus her attention forward down the lane rather than back or up at me. I actually settled on this release method after trying three different ones and having people watch Koira launch from each of them. Then we decided which one she looked the most balanced during, which ended up being the one you see above- her front legs on the ground, back feet up on my thighs, and me holding onto her hips.

It might not mean a whole lot to you if you don't play flyball, but I'll say it anyway. Changing out starting position like this caused Koira to be much faster (good push off) and more consistent (no waiting for her front feet to hit the ground). So much so, in fact, that we had to back up 6+ feet to start this past weekend versus the weekend before.

Of course, after spending a lot of time thinking about starting and releasing positions and methods these past few weeks, I ended up getting quite a few pictures of other peoples' starting techniques.

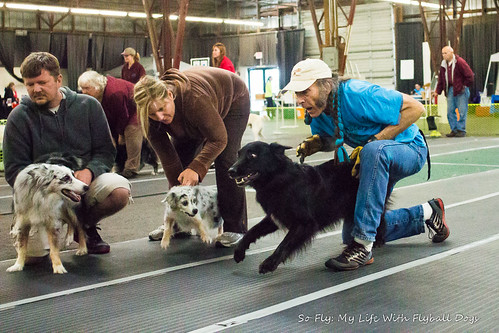
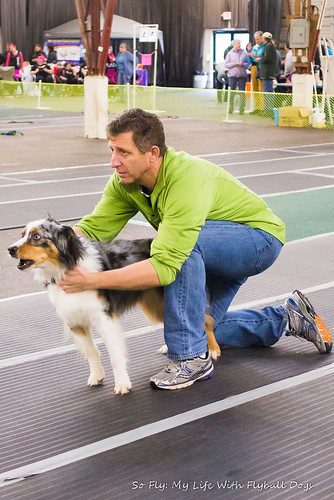
Down on one knee seemed very popular. I actually tried a down-on-one-knee method for Koira, but didn't like it as much for us. From the pictures, though, many people obviously really like this method.
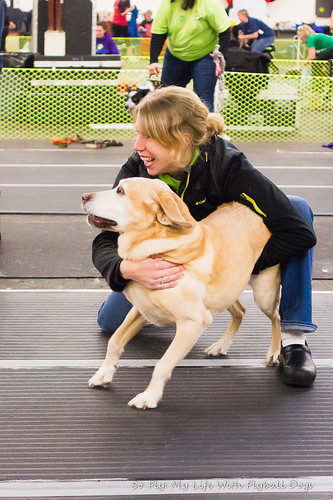
Stumptown-9717
Down on one knee, dog pulled back against other leg, with back foot perpendicular to the racing lanes. This is the closest I have to a picture of the one-knee method I tested with Koira 
Although it appears that there are a number of different variations of the one-knee method as well.

Stumptown-9785
Down on one knee, with the dog pulled back against the leg with the knee down.

Stumptown-9714
One knee position, dog loaded back against the leg with the knee down, kept in place facing forward by the other knee

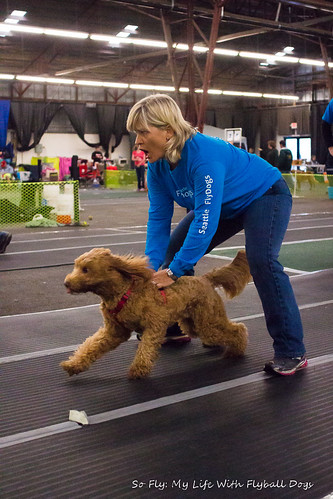
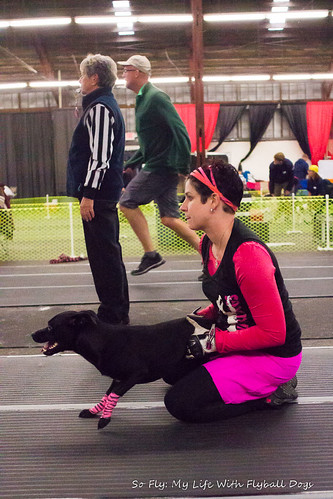
Then, there is this two-knee method. It appears different from the method I use, because the dog is pulled back between the knees with the back feet still on the ground, where as I pull Koira's back feet up onto my thighs.
Stumptown-9804
Both knees down, dog loaded between the legs with back feet still on the ground


There are also a number of ways to start your dog while staying standing. I will say that these tend to be easiest on the handler, because you don't have to get up quickly from these. If you have a short dog, though, your back can get sore from leaning over so much.

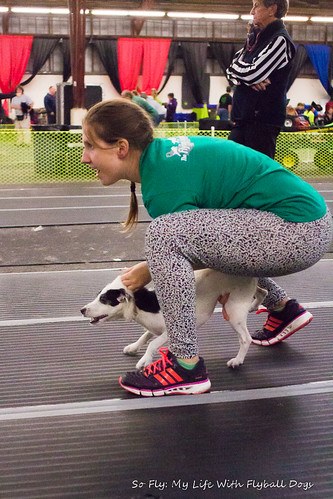
The first of the standing positions is more of a crouch. The knee isn't actually on the ground, but is certainly bent.
Stumptown-9842
Somewhere between a one-knee method and a standing method, this crouch is none-the-less quite effective for this team

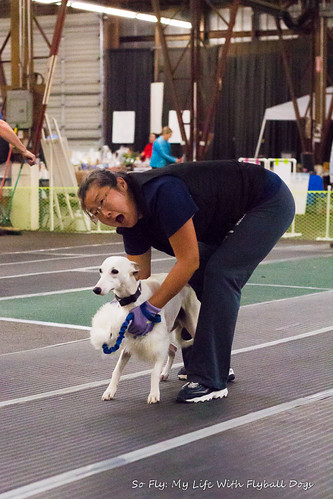
And then same thing here, only with the legs a bit straighter. Also, this whippet appears to be pulled back against the leg that is farther back, to give a better launching platform.
Stumptown-9980
This whippet is obviously very forward focused, and you can see how it is crouching down a bit, anticipating being released to run.

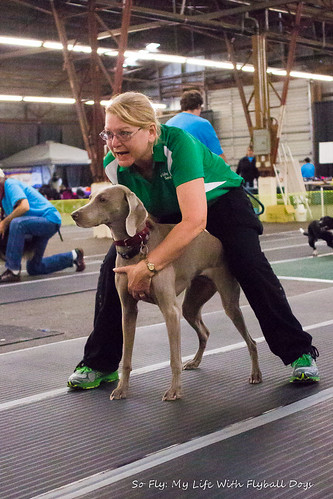
The straddle method is very popular as well.
Stumptown-9839
Lacey, the dog here, is super mellow while waiting, but runs really well once released. All her handler has to do is let her hands drop away from Lacey 

Stumptown-9822
And this dog is obviously incredibly excited and raring to go. 

Last but not least is the side release standing position, with the dog fully off to one side of the handler.
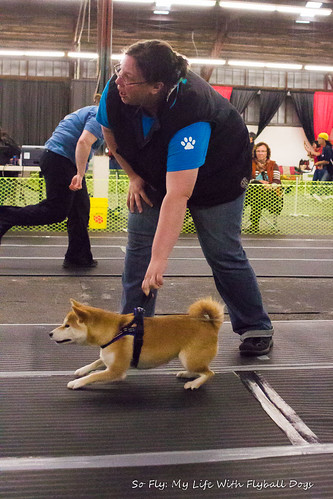
Stumptown-9814
This little shiba was also very obvious about wanting her turn as well. 

All of these positions can work great depending on the specific dog/handler team. I'm also positive that there are plenty of other release methods that I didn't get a picture of! Some dogs need a really steady launch platform on or against their handler, while others crouch down to the ground or simply dig into the ground with their feet. While there might be a right way for a certain dog and a certain handler, there is definitely not a right way for all dogs and handlers. If you are struggling with how to release your dog, get a training buddy and practice. Try out the different methods while just doing recalls with your dog and see which ones feel the best for you and look the most balanced for your dog. As I found out this past weekend, it can make a huge difference in how your dog runs if you find the right release.

Friday, October 5, 2012

Making Flyball Safe: Jumps

Part Two of Making Flyball Safe (see Part One: Box Turns)

I often hear people mention that flyball is not a safe sport. Generally, these are people who are involved in other dog sports such as agility, disc, obedience, or freestyle. They are experienced dog people. They simply haven't been exposed to flyball in a proper way.

The flyball box is not the only component out on the flyball lanes, of course. When you ask a dog to run at top speed over hurdles, there are risks involved. The most important thing is to minimize those risks as much as is possible.

It is not unheard of for a dog to hit the jump with their feet or legs while navigating the course. It is our job as trainers and handlers to train the dogs to not hit the jumps, give them the skills to navigate properly, and minimize the risks for if they do hit a jump.

Flyball jumps, unlike those used in agility, are solid. A flyball jump is a 6 inch tall, two foot wide base board and two uprights on either side of it. The most common material for the jump to be made of is plywood, but more and more jumps are being made out of Sintra, a rigid foam board material. Sintra is softer than plywood, making it safer in case of collision between dog and jump. To adjust the height of the jumps, slats are added on top of the 6 inch base board. Slats can be 6, 4, 3, 2, or 1 inches wide, and any combination of them can be used to reach the appropriate height. However, a one inch slat is required to be on top. The one inch slat is the easiest to break due to how thin it is. Slats are made out of either very thin plywood or else, more desirably, Sintra.

Ideally, if a dog knocks a jump slightly, the bump won't be enough to cause injury. If the bump is harder, it will hopefully break the slat, giving way to prevent injury to the dog (Sintra does not become sharp when broken). In practice, to further minimize risk of injury, we put cut pieces of either foam pipe insulation or slit pool noodles over the top of the jumps. This greatly reduces the chance that a glancing blow of the paws on the top of the jump will cause any injury.

The equipment, however, is only part of the equation. Training is the other part. We spend time every practice having the dogs navigate over the jumps. Since the jumps are always ten feet apart and fifteen feet from the box, the dogs easily can learn an automatic pattern on how to jump safely. Various methods can be used to help dogs adjust their striding to additionally minimize risks of hitting the jumps. For example, dogs who launch early for the first jump can be at risk of hitting the jumps as they make themselves stretch and reach in midair to clear the jumps. Stride regulators can help train these dogs to make that first launch closer to the jump, so that the apex of their stride is directly over the jump.

Occasionally, it is helpful to teach the dogs about what to do if the jumps are NOT exactly 10 feet apart, or not straight, or are different heights. Mistakes can happen, another dog can knock a jump askew, and it is important to teach the dogs to deal with this. We don't do it often, as we want them to pattern to the jumps at regulation distance, but it can be very helpful to run jump drills with things askew occasionally.

Knocking the jumps over completely, making them a little crooked, setting them to different heights, all of these are ways to help teach a dog to deal with these same issues if they happen during a real race. I always start with a single jump and carefully encourage the dog to jump over it safely, be it askew, a strange height, or completely over on its side. Once the dog is comfortable with jumping the not-right obstacle, I will add in another jump. The goal isn't to train the dog to jump strange configurations of the jumps, and I would actually prefer, if the jump is extremely off during a competition, that I either not run my dog or, if it is too late, that my dog skip the jump. But I think that my dog is much safer on the course if introduced to irregularities in safe, controlled settings.

Thursday, October 4, 2012

Making Flyball Safe: Box Turns

Part One of Making Flyball Safe

I often hear people mention that flyball is not a safe sport. Generally, these are people who are involved in other dog sports such as agility, disc, obedience, or freestyle. They are experienced dog people. They simply haven't been exposed to flyball in a proper way.

Years ago, flyball was a sport that risked some pretty significant injury, especially from repetitive stress. Before the modern flyball box was created, dogs were trained to run fast down the lane, slam into a pedal with one or both front feet, coming to a complete stop, catch the ball as it launched, then pivot and run back to their handler. Both the abrupt stop and the hard pivot were likely to (and did) cause injuries, both acute and, more often, chronic. Arthritis in the front shoulders was common in older flyball dogs. 

Flyball, however, has come a long way since then, in both equipment and training. Flyball boxes now have holes positioned to either side, instead of in the center. The front pedal is a padded surface large enough for all four feet to land on, instead of just one or two feet. Thrusters launch the ball more efficiently and predictably. We now spend months training dogs to use all four feet to create a smooth "swimmers turn" on the box, eliminating the abrupt stop and slamming of the front feet, legs, and shoulders and also the stress on the back and rear from the following pivot. The swimmers turn allows dogs to safely retrieve the ball from the box more quickly and with less stress on their bodies. 

Those who have followed my blog for a while will know that I have been spending, quite literally, years training Koira to have a proper box turn. This isn't out of some desire to have a super fast dog, or win races, or set records. I want her to have a good turn so that she is able to play flyball safely and with the minimum amount of stress possible on her body. Some dogs who run slower and self-regulate how hard they hit the box may be able to run flyball for years with a poor turn without any injuries. Koira, in my opinion, runs too hard and too fast, and has too little self preservation instinct, to be allowed to do any sub-standard turns without a risk of injury. (As a note, normally it should not take this long to train a safe turn. Unfortunately, I trained Koira with a poor turn before I knew any better, and have since spent years trying to correct it.)

I would compare training a proper box turn in flyball to training good contacts in agility. It can be hard. Some dogs take to it super fast, others take forever to learn it, and some need constant reminders about how to do it right. If you don't bother to train contacts, your dog may never hurt themselves, but the risk is much higher that they will launch themselves off of a piece of equipment early and become injured. There are many different strategies for training contacts. Some work better for some dogs and less well for others. But it is important to spend the time and effort to train it properly. 

All of these things are true in flyball as well, except that in flyball, the dog and the team are not penalized for a poor turn (while a missed contact in agility is penalized). This means that the handler has the burden of doing the right thing in training to keep their dog safe. They have to spend the time and effort in training, not to succeed in the sport (though dogs with good turns have much faster times) but to keep their dog safe and healthy. Sometimes, this means training a "good enough" turn that the dog will consistently perform without a high risk of injury, but without spending years to train the "perfect" turn. A "good enough" turn depends a lot on the dog. (Some dogs can perform a three-footed turn safely for years without a significant risk of injury. Other dogs may do a three footed turn in a way that increases risk of injury.) 

I urge those of you who hear (or especially those of you who say) that flyball is not safe to spend some time checking out what goes into making this sport as safe as possible for the dogs who play it. Is there a risk of injury? Of course. Every time you let your dog play fetch, go swimming, or play any sport, there is a risk. The goal in all fun activities should be to minimize that risk as much as possible. I believe that is what good flyball trainers and teams do.

Friday, September 30, 2011

Flyball Training Series: Building a Box Turn

(As a precurser to this post, I will once again appeal to people on Facebook to go "like" Koira's picture. Only a few hours left in the contest and Koira is three votes behind. Just click on the link and "like" her picture!)

I realized it has been way too long since I last posted part of my Flyball Training Series. If you missed Part 1: What makes a flyball dog or Part 2: Jumps, drills, motivation, and direction, you can go back to read those and catch up.

At this point, you have found a number of things that fully motivate your dog. I prefer tugging as motivation, but you can use anything.

You have also determined which direction your dog turns easiest (remember, turn direction is always referred to as the dog's directions). Both of my dogs turn to the left.

You may have also trained the touch-stick behavior, which will be helpful with this next step.

To start building a box turn, first, you need to know what your end goal is. A good box turn has a number of elements that should all be present. In order, the dog should take off for the box, land high with his front feet, followed immediately by his back feet, with head positioned low and near the ball hole, catch the ball as it is triggered, push off from the box strongly, and land in the lane, facing back toward the handler. The dog's body position on the box is very important. You want the dog landing horizontal on the box, not at an angle or vertical. All four feet need to land on the box, and the back feet need to be high up to maintain proper positioning, not down low. You want each foot to hit the box only once, then push off strongly.

Pallo, showing proper horizontal box positioning

This sounds complicated. It is, sort of. The box turn is the hardest part of training flyball for most people and dogs. But, when trained properly, a good box turn shouldn't be that hard to achieve.

There are probably as many methods for training a box turn as there are for training any other complicated maneuver in any sport. I'm going to share what I know of each method, letting you know which I use (or used, as Koira was originally trained differently), and what I see as the pluses and minuses of each.

A good first step for training any method of a box turn is an over-and-back. Using a touch stick (or a motivator held in your hand), have a helper hold the dog on one side of the jump. Stand right next to the side of the jump your dog should be turning toward (I stand on the left, because my dogs turn left). Reach over the jump, have the helper release the dog, and use your hand/touch stick/motivator to lead the dog over the jump, then quickly back to the side it started.


 You want the dog to land-turn-return all in one smooth motion. It will take a few tries to get that smooth motion. This is duplicating the body motions the dog will be using once on the box, working the same muscles.  It is a great starting point for any of the methods for training a box turn. (Koira did not start out doing over-and-backs, but Pallo did. I have since taught them to Koira, and work both dogs with them occasionally, just for fun.)


Once your dog is doing over-and-backs smoothly, you can place a turning board on the ground in the area the dog lands. A turning board is just a piece of plywood or similar, covered with the same type of matting found on a flyball box. Some dogs don't like stepping on a new surface, so it helps to get them used to it flat on the ground first.

I have used three methods for teaching a box turn. I recommend using two of them.

Method One (the not recommended method):
(This is the method Koira was originally trained with. It gave poor results, and I am still trying to fix her turn. I am sharing it so you know what NOT to do. Some classes still use this method. I didn't know any better when I started training Koira. I'm hoping by sharing this, it will help someone else avoid the years of retraining I have spent on my dog.)

Start off to the side of the box. Load a ball in the box. With the dog on a lead, run quickly toward the box, using your leg/knee to encourage the dog to place feet onto the box and grab the ball. Once the dog is regularly stepping onto the box without too much encouragement from your knee, add in a cone in the center of the box. With the dog on a lead, encourage your dog to circle the cone, placing feet on the box and grabbing the ball. Start wide, then gradually straighten as the dog gets the picture. You can also add a jump of some kind along with the cone, to encourage the dog to jump onto and off of the box. Some people who train with this method will teach a go-out on the flat, training the dog to circle the cone and return (we didn't).

This method of training is unreliable. It trains a wide, sloppy, slow, and low turn. (If you have questions as to why and how, feel free to ask and I will clarify.)

Koira, with her front feet badly placed on the box, demonstrating a low, wide, slow turn (this is a turn to the right, she now turns left, I changed it as part of our retraining process.)

In any case, why don't we return to what you SHOULD do?

Method Two: 
(This is the method Pallo was trained with.)


Move your jump for the over-and-backs closer to a wall, and place the turning board between the jump and the wall. Using a 2x4, multiple 2x4s, or other sturdy blocks, slowly put the turning board at a low angle against the wall. (You can easily practice this part at home, even without owning a box.) Continue doing over-and-backs like this, until the dog is comfortable with the landing side being slanted. Place both jump and turning board in front of your box. Use the box to prop up the training board at increasing angles. Maintain your criteria for a good, fast, four footed turn with all four feet crossing the jump, landing, then returning smoothly. Over time, you will increase the angle of the turning board until it is the same as the angle of the front of the box, at which point you will move the jump in front of the box and take the turning board out.

Once you have a good turn, you add in the ball. It can be added in earlier, on velcro on the turning board, if you want. We normally will jam the box at first so that it doesn't fire at full speed, then let it fire faster once the dog is comfortable and grabbing the ball.


Method Three: 
(I haven't used this method much, but want to try it some more. It comes highly recommended by some top teams.)

A touch stick behavior is required for this.

After doing over-and-backs, take the jump out of the way. Have you dog stand against the wall, placing the front feet up on the wall. Mark the wall with a tape line at the dog's elbow height. Use the touch stick to encourage the dog to bounce off the wall above the line.

 If the dog just puts up their front feet, move the stick higher or have someone hold the dog back, to get a running start. Have the dog jump up, then whip the stick away straight out. Reward the dog after every turn. Change the positioning of the stick on the wall (higher, lower, farther to one side or the other) to adjust the dog's body position on the wall so that they are bouncing horizontally off the wall above the line.

Doing the opposite of the above method, where you slowly ramp up the angle, you put in a ramp in front of the wall and slowly ramp down the angle before replacing it with the flyball box.

This is supposed to train a very high, straight, fast turn with no lagging, double hitting, or hang time.


Method Four:

I have also used an additional method, similar to Method Two above, but using a specially built adjustable ramp that I made. It is made to be used with a snub-nosed box, like the one I own, and I have found it a really nice way to teach a good box turn. But, since most people don't use snub-nosed boxes, its a little bit silly to share it in detail.

Tuesday, August 30, 2011

Starting a flyball dog- Jump drills, motivation, direction

You've decided to start flyball training with your dog. Your dog is motivated by food or toys and you are willing to dedicate some time and effort to the training process. But where do you begin?

Motivation:

Find the toy or treat your dog is excited about and willing to work for. I prefer using a long (4+ feet long) tug toy, and will put effort into getting a dog to play with a tug. Other people successfully run their dogs for various toys (stuffed, tugs, treat-baited, even laser pointers) or treats. I just find a tug to be easier for me and an effective motivator for my dogs (though Pallo took 2 months to become the crazy tugging maniac he is today).


Jumps (2 person, 1 dog drill):

When a new dog comes to our class, they start out with back-chaining over jumps. Four jumps are used in flyball, and back-chaining just means that we teach them the jumps one at a time. Starting close up over jump 8 (jumps are numbered in the order the dog crosses them, 1-4 on the way to the box, then 5-8 on the way back to the handler, so jump number indicates both which jump and which direction the dog is moving), the dog is held by one person close to the jump while the handler stands or crouches on the other side of the jump with food or a toy held out over the jump to the dog. Most dogs will easily go over the jump to their handler, where they are then rewarded. (We don't recommend using a sit-stay to keep the dog behind the jumps until the handler can get to the end of the course, then releasing the dog from the stay. Part of this drill is to build speed, desire, and drive, which is best built when the dog is restrained, allowing them to pull against the person holding them.)

Both dog and handler move back in increments to give the dog more options. It can go around the jump, but is encouraged and rewarded for going over the jump. This is the method we use to teach all four jumps, backing up a little bit if the dog shows a desire to run around the jumps and slowly adding another jump in, then backing up to 15 feet from jump 5. The dog can then complete what we refer to as a run-away (other teams will sometimes have other names for this). Basically, a run-away is the dog being held with its back feet on or just in front of the flyball box, then recalling quickly over four jumps to the handler.

Once the dog is doing a run-away, the handler begins to change their position to running away from the dog, with the toy/reward held out in the LEFT hand, veering to the RIGHT side of the run back area. This is important for when other dogs are added in later. It will help your dog run on the right side of the lane (which reduces the risk of a collision over a jump if another dog ends up loose on the course) and keeps the handler out of the way of other running dog/handler teams.

ETA: As Patty pointed out in a comment below, some people like to use gates to keep the dogs in line when first teaching them the jumps. We've never really found this to be needed on our team dogs, though we have one older dog who began with a different club who we do fence in because of a long-term habit of skipping out on the jumps.

Variations:
Once dog and handler have run-aways solidly down, you can add in variations by changing the spacing of the jumps (in a course, jumps are spaced 10 feet apart), changing jump height (you can keep them all the same or vary the height of them), knock the jumps over, etc. This will help your dog stay safe on a course even if a jump has been knocked out of place or knocked over during a race. In an active race, if the dog continues to clear jumps as if they are still upright, the run is clean even if the jump is out of place or knocked over.

Another variation is instead of holding the dog at the box, directly in line with the jumps, you can move the dog off to the side, a little at first, then more as they are solid. This helps teach a dog to still come back over the jumps even after a ball bobble at the box sends the dog far off to the side (I can proudly say, this is something Koira excels at, even when really far over, she will still come back over the jumps).

Other Jump Drills (1-2 person, 1 dog drill):

You can also practice other jumping drills with your dog to improve respect of the jumps (important to teach dogs to not run into or smack their feet into the jumps, preventing both injury to the dogs and damage to the equipment), improve athleticism, get the dog thinking about what it is doing, and overall conditioning. We don't run this in class, but I practice them at home and find them to be a helpful additional training drill.

Two drills borrowed from agility training are four-squares and pinwheels. Both work in a similar way, with the jumps close together and the handler near by. It is useful to have an additional person to assist, but can be done with a sit-stay, unlike the run-away jump drill above.

For four-square, set up four jumps as the four sides of a square. Start by having the dog on one side of the square, sitting just in front of the jump, with the handler on the far side of the square. (Starting from a sitting position helps build rear-end muscles for more powerful jumping.) Call the dog, and reward when the dog pops over both jumps. More complicated routines with the four-square add in a turn, with the dog on the outside of the handler, then the handler will toss the toy/reward across the other two jumps of the square, encouraging the dog to complete those as well.


Pinwheel is set up with the ends of the jumps in the middle, with each of four jumps spreading out like rays. Start sitting, as in the four-square drill, and encourage the dog to jump over each jump in turn.


Another jumping drill is power-jumping. Basically, you set up jumps, in a number in excess of 4, then do restrained recalls over those jumps. Eight or more jumps can sometimes be used, helping build endurance and drive. Just be careful not to overdo it, as this is a lot of work for your dog! Then again, it is a lot of work for the handler too, as you should always be running away during restrained recalls.


Direction (2 people, 1 dog):

The other thing we always do at the first class is try to determine which direction the dog turns. Like people are right or left handed or footed, dogs turn easier either to their left or their right (as many people involved in agility or herding probably already know about their dogs). Some dogs show a strong preference one way or the other, while other dogs seem to have little to no preference. Make sure when trying this that you are not in a location with lots of distractions, as it may effect the outcome.

The way we test for this is pretty simple, but requires two people. The handler holds the dog. The other person walks straight out in front of the dog about 20 feet away, places a ball on the ground (or a toy, or a treat if the dog will not pick up a ball yet), stands stationary on the other side of the ball from the dog. The handler releases the dog to get the ball, and takes note of which direction the dog turns to return- left or right (the dog's left or right, always). Repeat 3 times. Take note of which direction the dog turns more often. This is the direction the dog turns, and will be important when you start box training.

One last thing:


Though not essential, it can be easier to train some things if your dog has a touch-stick trained behavior. This means that your dog will touch the marked end of a stick on command, including following the moving stick, jumping, etc to reach that marked target on the end. Try to refrain from using a ball on the end of a stick, and even if you have the hand-touch behavior, try transferring that behavior to a touch-stick. I taught this behavior with a clicker, but you don't need to. In fact, you don't need this behavior at all, I just find it makes training easier.

Pallo, jumping up to "touch" (note the black part at the end of the stick)

Saturday, August 27, 2011

What makes a flyball dog?

Due to a comment on my blog post yesterday by Catalina, from Just A Pup, I decided I should probably do a post about flyball. Not just flyball training with my dogs, but the basics, the beginning, and what it really takes. The blogging world missed out on the early training with both of my dogs, and I only started blogging after both of them were well into their training, Pallo competing, Koira dealing with a number of training issues.

So first off, what makes a flyball dog? Depends on who you ask. My response is: Any dog who is motivated by food, toys, or a drive to please you can learn to be successful at flyball. Dogs must be physically able to run and jump, and preferably be at a low, healthy weight with healthy joints. They should ideally be non-aggressive toward other dogs or humans, though levels of aggression can, of course, be worked on with the proper trainer. A super-successful, competitive flyball dog on a world-record-setting team has a lot of other requirements, but lets face it, that't not the goal most of us have. We just want to get out and have some fun with our dogs. I'm going to write this as geared to those people who currently have a dog and are interested in learning this sport with them.

I did pick out Pallo specifically for flyball. I wanted a height dog who would be competitive. When going to meet him, I brought along Koira, some toys, and treats. I spent some time with Pallo visiting him, testing his interest in toys (super high), his willingness to work for treats (really high) and his general behavior around people, dogs, and cats. I wanted a companion dog for Koira as well as a flyball dog, so it was important that Pallo fit in with her as well as me, and he did.

While Pallo was interested in the ball more than any other toy, he would drop the ball for a treat, and readily gave it up. He also, while very interested and motivated to retrieve, would NOT do a totally mindless scramble after any ball that went rolling. While sometimes amusing, ball obsession (not to be confused with toy/ball drive) can be a huge hurtle to overcome in flyball training. It can be overcome, but is certainly not ideal. Without proper training, the dog can end up dangerously in the other lane, in the way of other dogs, stealing balls from dogs potentially protective, tripping humans, driving straight through jumps or fences to get the ball, and generally creating havoc. In flyball, the ball is part of the game, but it is not the game. The ball IS NOT the game.

A dog who is properly motivated by toys, treats, and a desire to please is easy to train. Using the right methods, they will learn fast. You just have to make sure what they are learning is what you want them to learn. A handler with experience in training will have more success with training flyball, but any motivated handler who is willing to work will be able to train their flyball dog.

The end goal of a trained flyball dog is multifaceted. The dog will, when fully trained, be able to be released 20-50 feet from the start line of a course, pass an outcoming dog closely at full speed, complete all four jumps quickly, execute a proper box turn, catch the ball from the box, return over all four jumps, bring the ball across the finish line, passing an incoming dog going full speed, and return to their handler. In essence, a trained flyball dog has 5 main skills that are trained, which altogether create a successful flyball dog: Run away from the handler 100+ feet at full speed; Pass another dog while both are running full speed without turning, slowing, snapping, or showing interest in the other dog; Jump four hurdles; Execute a proper, fast, safe box turn, including catching the ball when fired; Return to the handler at full speed, allowing themselves to be caught.

Many people have many training tips. Different techniques are used for training each step and each behavior used in flyball. I have used a number of them, seen others, heard about more, and undoubtedly have never even thought of any number of additional training methods. Each dog will need individual work, and may learn better with one method than another. In the end, a flyball dog has a willingness to please and work with their handler, allowing them to both succeed.

Since Catalina, who asked the question prompting this post (which will be one of a series of ongoing flyball training posts, hopefully) owns a Tibetan Terrier herself, I thought it would be appropriate to share some pictures of Pippin, a Tibetan I trained in flyball until he developed cancer.

He was a fun dog to work with. He had some dog aggression issues that we had to work through, but was food and toy motivated, and he loved nothing better than strutting around, pleased with himself, being told how awesome he was. (While I use past tense, I refer only to his flyball training, as he is still alive and kicking despite dire predictions when he was diagnosed.)
Pippin never made it to competitions but he loved the training we did together. I have also worked with a number of other Tibetans on flyball training, including Pippin's daughter Dharma (an active agility competitor), Fannie (Dharma's half sister), Guilty (Fannie's pup), and Sargas (Guilty's sire), as well as sisters Kizzie and Lexi. Each one had their own favorite parts of training, places where they excelled, and things they needed extra work on. I am hoping to be able to work with some of them in the future again to the point of being able to compete with them. Breed standings in NAFA flyball don't include many Tibetans, and the top dog in the breed is retired. But I guess if I don't get these guys up and running fast, Tibby might just get there first!


A few more things:

THANK YOU to every one of my 100 followers! It's an awesome mark to get to, and I am coming up with a giveaway soon to reward all of you readers, so stay tuned!

Also, on the 7 links from my own blog posting challenge, I am supposed to pass on the challenge, and haven't yet. So, here goes. I am passing this challenge on to:

Inu-Baka

Gardening with Wyatt

Borderblog

The Court of Tails

Just A Pup

Looking forward to seeing the posts you guys pick!